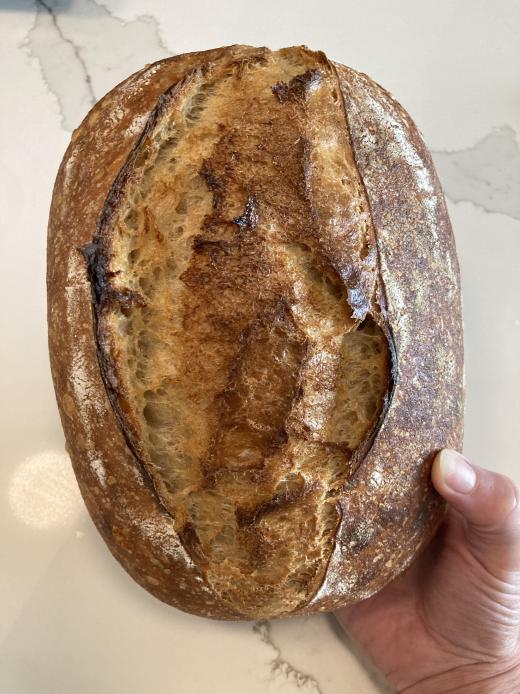
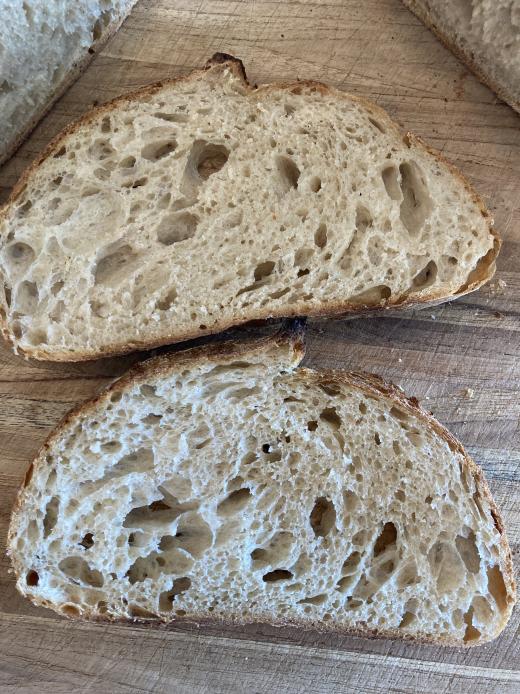
High Hydration Sourdough with Open Crumb
This post may contain affiliate links.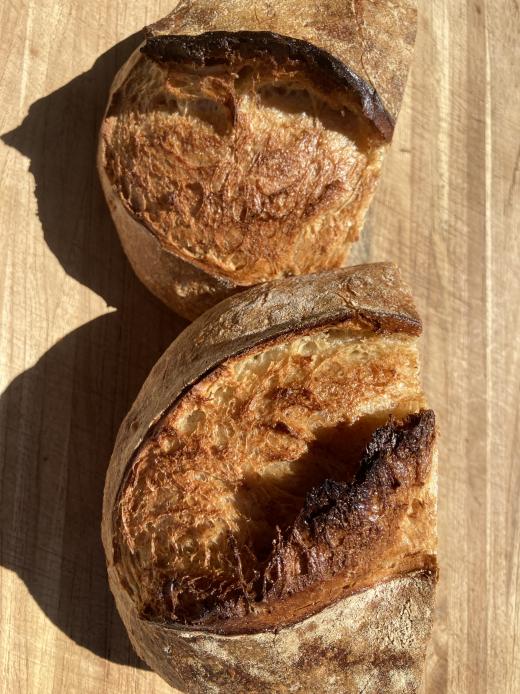
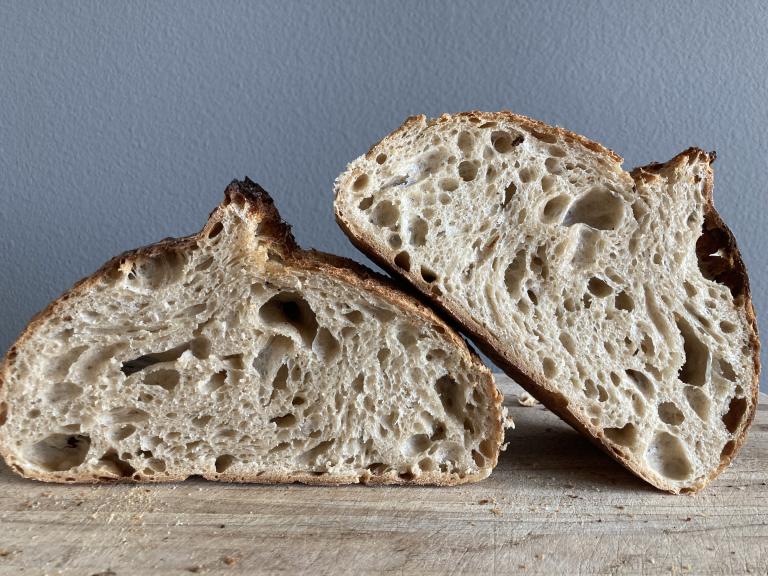
Recipe and steps for a sourdough with high hydration and beautiful open crumb that will make you look like a pro baker!
This loaf has a hydration of 82.5%. If you don’t feel quite comfortable handling that high of hydration, then lower the water for this recipe. I often stay in the range of 75%-83% depending on the type of flour I have or loaf that I want for the day. So anywhere between 322-357 g water is going to produce a great loaf. Any higher of hydration and I would make sure to add a little bit more wheat flour, but the same method applies.
Whole wheat is higher in protein so it needs more water than a dough that is all bread flour. If you try to make a 85% hydration dough with just bread flour it is going to feel and taste more stretchy and rubbery. Higher hydration, with the proper techniques, creates that desired open wild soft crumb. The benefits of higher hydration are not limited to the crumb. The crust is going to be crispier and the bread will stay fresher for longer. Lower hydration doughs can turn crumbly in just a day. To learn more about sourdough hydration levels checkout my blog post.
This is the basic recipe template I go off of when I make sourdough. Try adding more water, flour or different flour combos to perfect your sourdough. My favorite variation is with Einkorn. It creates a very flavorful bread and is incredibly nutritious. I like the flavor of it much more than whole wheat. Einkorn does have more protein in it than standard whole wheat and will be a little sticky. Make sure you autolyse for at least an hour with this flour so it can fully hydrate. You can find Einkorn in most stores, I like to use Jovial Organic Einkorn Whole Wheat Flour. If you want to go above and beyond, I highly recommend grinding your own wheat berries!
Tips
- The more water you add, the faster the bulk fermentation will go
- Whole wheat flours ferment faster than white flours so keep this in mind when adjusting the ratios
- Don’t do too many stretch and folds or coil folds. If you feel the dough is tight and doesn’t have much slack, push off your fold. Sometimes messing with the dough too much can have an adverse effect. Listen to what your dough is telling you.
- If you want even higher hydration try adding a little bit more whole wheat flour, experiment as you increase the water.
- During the bulk fermentation try to keep the location and temperature the same. Varying termperature changes will lead to varying sizes of air pockets in the crumb as the fermentation slows or quickens.
- The amount of starter can also be adjusted. Add more and the dough will ferment faster, add less and it will take longer but have more flavor.
- If you don’t like the flavor of whole wheat, lower the hydration to 70-75% and slowly build up by swapping out 10g of the bread flour for whole wheat. It has a very strong flavor that can take time to become accustomed to. As you swap out the flours, slowly increase your hydration level as well until you find a ratio that is ideal.
What are the timings?
- 8:00 am: feed starter
- 1:00 pm: mix flour and water
- 2:00 pm: add starter
- 3:00 pm: add salt
- 3:30 pm: stretch and fold
- 4:30 pm: lamination or fold
- 5:30 pm: coil fold
- 7:00 pm: shape and cold proof
- 8:00 am(next day): preheat oven
- 9:00 am: score and bake
Step by Step Instructions
1. Feed your starter
I recommend a 100% hydration starter for this receipe. This means equal parts water, flour, and beginning starter, a 1:1:1 ratio. For this recipe, I generally feed mine 10g rye, 60g all-purpose, 70g water, 70g starter. Let sit in warm place for about 5-6 hours until starter is at peak and bubbly.
You can do a stiffer starter, but the bulk fermentation time will need to be slightly adjusted. Your starter is also going to take longer to be at peak. This can be useful if you want to adjust your timings and have the starter last throughout the night so you can mix dough in the morning.
2. Make dough
Measure 353g bread flour and 77g whole wheat flour. Add flour to bowl and mix 355g filtered water until fully combined. Dough will be very sticky.
3. Autolyse
Let sit covered for at least 1 hour and up to 3 for optimal hydration and gluten development.
4. Add starter
Measure 80g active starter and add to dough. Pinch around the dough to make sure all the starter is mixed in, it will take a few minutes of kneading. Let sit covered for 1 hour.
5. Add salt
Measure 10g salt and add to dough. Mix until you can’t feel any grains with your fingers. Let sit covered for 30 minutes.
6. Stretch and fold
Wet dominant hand and with the other hand grip the edge of the bowl. With your wet hand, grab a section of the dough and gently strech up and out. Fold back into center and rotate bowl. Continue stretching and folding until you have gone all the way around the bowl. The dough should look and feel tighter.
Let sit covered for 1 hour.
7. Lamination
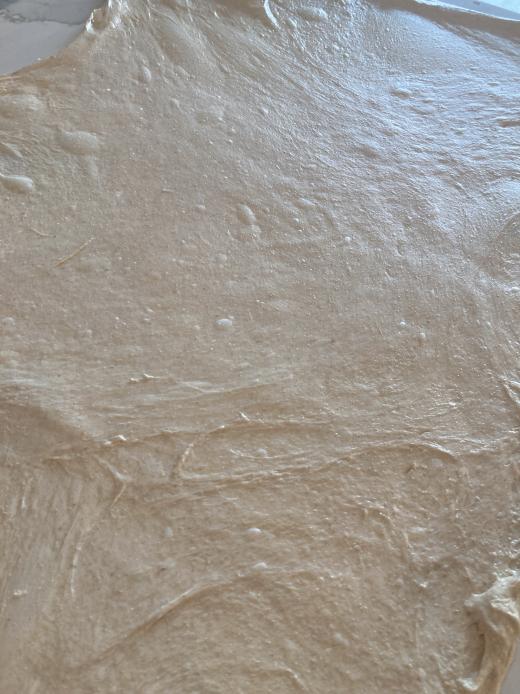
This is the step that consistently creates nice open crumb. It is also the point where you can add some additions to your dough like sesame seeds or dried fruits (that have been soaked!). You can replace this step with another stretch and fold or a coil fold if you do not have time or space.
Wet hands and counter and pour/scrape dough onto clean wet surface. Gently stretch dough until it is very thin throughout. Be careful to not stetch too far so that the dough tears. At this stage you will notice little bubbles that have formed in the dough.
Once you have the dough fully stetched, fold it up like a blanket and put back into bowl. Let sit covered for 1 hour.
8. Coil fold
This step can be replaced with a stretch and fold, but I find that at this late stage a coil fold is less disruptive than a stretch and fold.
Wet both hands. Grab the left and right edges of the dough and pull up and out of the bowl. Slowly place back down, letting the dough fold onto itself. Rotate bowl 90 degrees and perform another coil fold.
You can add a few more coil folds, in 30-1hr increments if the dough still feels sloppy and wet. The higher the hydration of your dough the more coil folds you will need to do to strengthen the dough.
9. Bulk Fermentation
Leave dough covered on counter in a warm place for about 1 - 2 hours depending on the temperature of your home and humidity. It can be tough to tell when the bulk fermentation is complete but you will get used to it the more you bake. You will see small and medium bubbles all over the surface of the dough. Wheat flour is going to ferment faster than white so keep that in mind as you change up the flours you use.
10. Shape
Once you have decided the bulk fermentation stage is complete, lightly flour your banneton with rice flour. Other flour is fine as well, but rice flour prevents the dough from sticking better because it doesn’t absorb as much moisture.
Scrape your dough out onto a clean, lightly floured counter. Perform a letter fold by taking one side of the dough and stretching it up and then folding towards the center. Repeat with the opposite side and then the remaining two sides. Flip dough over and gently shape into a boule (ball) by using both hands or a bench knife to cup the dough and rotate slightly to create tension.
Let rest for 10-20 minutes.
Lightly dust top of dough, flip over with a bench knife and repeat prior step beginning with letter fold to create a boule. Flip dough seam side up and place into banneton.
If you prefer a more oval shape, then shape the dough into a bâtard. Begin by starting a letter fold but only complete two sides. Rotate the dough so that one of the adjacent sides it facing you. Grab the edge with both hands and fold it to about a quarter of the length of the dough. Slowly roll the dough and gently tug towards you with each roll until you have completed the shape. Pinch the edges together and then flip seam side up into a lightly floured banneton.
Cover dough with damp towel or shower cap and place in fridge overnight for at least 12 hours. You can go longer with this stage to develop more flavor.
11. Bake
Preheat your oven to 500 degrees with the pot and lid in the oven. I recommend using a Dutch oven or Challenger Bread Pan.
Flip dough out of banneton onto a piece of parchment paper that will just fit the dough. You don’t want it too big or it will prevent the sides from browning and also create wrinkles in the side of the bread, this is especially a problem with the dutch oven. Keep in mind, the parchment paper does need to be large enough to carry the dough to the baking vessel.
Score dough with a slash down the middle or score of choice and carry to baking vessel. Add ice cubes or spritz with water for steam and cover with lid.
Turn oven down to 450 degrees and baking covered for 20 minutes. Remove lid and bake for 20-25 minutes until brown. The dutch oven will need more baking than the Challenger Bread Pan.
Leave the dough to cool until it is cold to the touch, then slice and enjoy! Sometimes you can’t resist cutting into it when it is warm, but it will be a little doughy.
- 1 sourdough loaf
- 24 hours
- 40 minutes
Ingredients
Starter (Leaven)
- 10 g rye flour
- 60 g all-purpose flour
- 70 g starter
- 70 g filtered water
Dough
- 353 g bread flour
- 77 g whole wheat
- 355 g filtered water
- 80 g bubbly starter
- 10 g salt
- (Optional rice flour for dusting banneton)
Tools
- Scale
- Glass jar with lid
- Mixing bowl
- Bench knife, plastic scraper
- Shower cap, plastic bag, or damp dish towel
- Knife or bread lame
- Dutch oven or Challenger Bread Pan
- Parchment Paper
- Banneton or bowl with dish towel
Directions
Starter
- Feed starter. Mix 10g rye flour, 60g all-purpose flour, 70g starter, 70g filtered water.
Dough
- Make dough. Measure and mix water and flour in a bowl.
- Autolyse. Let sit covered for at least 1 hour and up to 3.
- Add starter. Add bubbly starter and mix until integrated. Let sit covered for 1 hour.
- Add salt. Add salt and let sit covered for 30 minutes.
- Stretch and fold. Perform a stretch and fold, then let sit covered for 1 hour.
- Lamination. Laminate dough by stretching it over wet counter. Fold back up and let sit covered for 1 hour.
- Coil fold. Perform a coil fold.
- Bulk Fermentation. Leave covered on counter for about 1 - 2 hours depending on temperature of home.
- Shape. Shape dough and place in banneton, cover and cold proof in fridge for a least 12 hours.
- Preheat oven. Preheat oven to 500°F with pot and lid inside.
- Score and bake. Turn oven down to 450°F. Score dough and transfer to baking vessel. Bake covered for 20 minutes. Remove lid and bake for an additional 20-25 minutes until brown.
More delicious sourdough recipes
This is one of the many fantastic sourdough recipes available on this blog